Today, favicons are an integral part of any online store. Even more – they are a part of the brand insofar as this image duplicates or partly repeats the brand’s logo icon.
When you create an online shop on the Shopify platform, the icon’s place will be taken by the Shopify logo. Naturally, every merchant wants to change it and add a logo of the brand. So, in this article, we are going to consider a few ways on how to add or change favicon to your store.
- Short recommendations for adding a branded logo to online shop
- Two simple ways how to add a favicon to Shopify via web
- How to add a favicon image via Shopify mobile app
- Final thoughts
Short recommendations for adding a branded logo to online shop
Brand’s logo image on the browser tab positively affects users’ experience. Namely, it helps to navigate the interface, boosts product recognition, increases click-through rate.
No doubt, you’ve already learned a lot about logo image requirements. Anyway, we would like to remind you of the most important of them.
- Size: Shopify (and other platforms) recommends using the size 16×16 pixels or 32×32 pixels. Even if the picture is larger than the specified size, the platform will reduce it to 32×32 pixels.
- Format: Icons should be the appropriate format – “.ico”, “.png”, or “.svg”. And, for example, the Can I Use service helps to check what formats are supported by different browsers.
If the logo meets these requirements, you can move to the detailed guides below.
Two simple ways how to add a favicon to Shopify via the web
So, there are two ways how you can insert your logo to a Shopify shop:
- Theme settings
- Theme actions
We are going to consider them closer in the following parts. Let’s get started.
Add favicon using Theme settings
And we start from the fastest and easiest way. It doesn’t require special efforts and knowledge. There are 5 steps how to do this:
- In the store’s admin click on the Online Store in your left-side menu. You will be moved to the Themes section automatically. This is what we need now.
- Click on the Customize button on the upper right corner of the theme block (If you want to edit another theme, select it from the list).
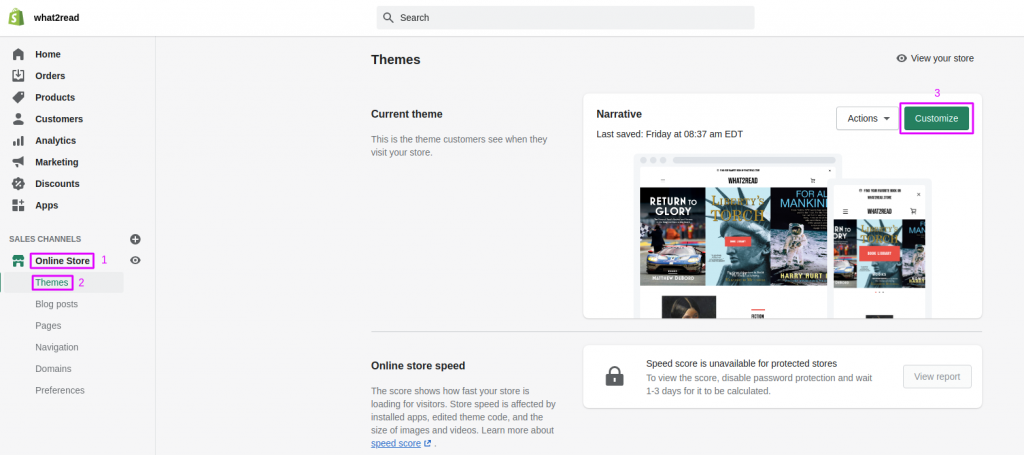
3. You will be moved to the settings section. In the bottom left corner, you can find Theme settings. Click on it.

4. The left side menu offers you different options. Among them, you will see the Favicon option. Select it and upload your image.

5. Save your changes. Now you can preview your store. You’ll see that the icon is changed.
In the same section, Shopify allows editing or removing the image. Just press on the pic and make the appropriate action: Change, Edit, Remove.
To enter an Alt text for an image, press on Edit and type the text in the appropriate field.
Now your logo is ready and optimized for search engines. But we offer you to consider other ways.
Add favicon by editing code
Before we start talking about steps, prepare your image. Please note, that the file name should consist of a name and correct extension: my-favicon.ico or my-favicon.png. Otherwise, it will display incorrectly.So, here is the instruction on how to edit code and insert a favicon.
- Go to the Shopify admin => Online Store => Themes.
2. As in the previous guide now you should click Customize near the theme that you are going to edit.

3. In the bottom left corner click on the Themes actions and select Edit code from the dropdown list.

4. Scroll the left side menu bar and click on Assets => Add new assets.
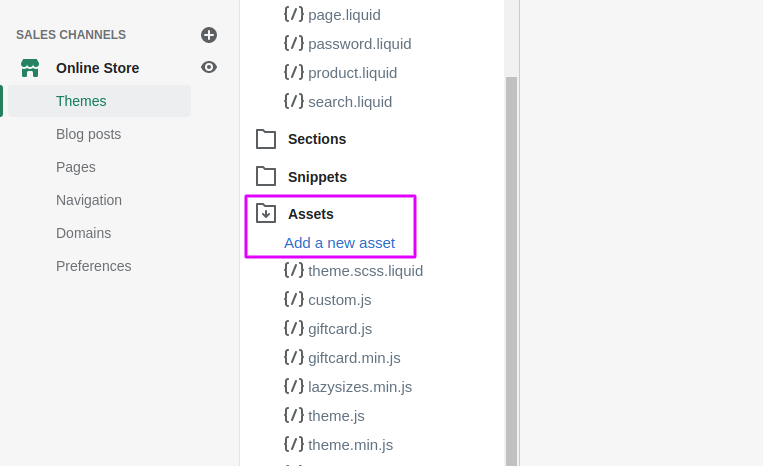
5. You will see a new window where you can upload files. So, click on Choose file and choose the file you want to upload. Now you should click Upload asset. After these actions, your favicon will appear in the Assets folder but it’s not the end. Just a few more steps;)
6. So, now scroll up and find the Layout section. There you will see a theme.liquid. Click on it.
7. In the displayed code you need to find the following string:
Usually, it’s placed somewhere in the beginning after the <head> tag. Anyway, copy it from our article and use Ctrl + F to find the snippet faster.
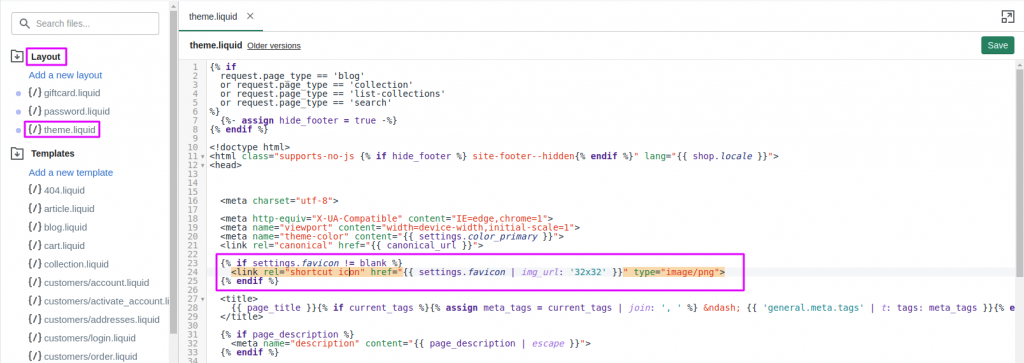
In this code snippet change this part: settings.favicon | img_url: ’32×32′. Look at our example:
NOTE: my-favicon.ico / my-favicon.png – the name of your image.
And the last step – Save.
Uploading via code can be simple too. To see a renewed image just refresh the page.
How to add a favicon image via Shopify mobile app
Now, let’s consider another way. Shopify provides a super-comfortable application. It allows making changes to your e-store from every smartphone or tablet wherever you are.
The steps are the same as in the web guide but with little difference.
- Go to the Store section inside your Shopify mobile application.
- Select the Online store. Here you need to click on the Manage theme button and select Customize.
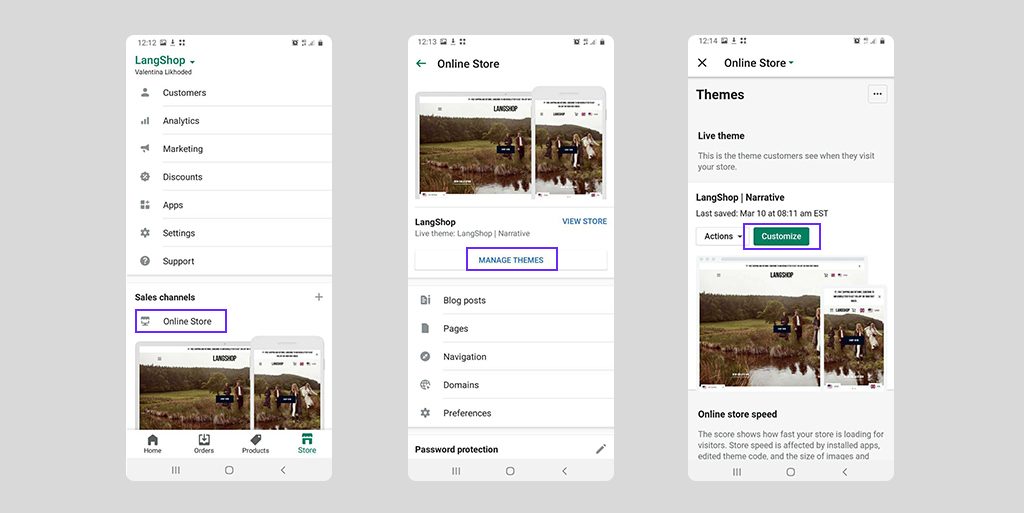
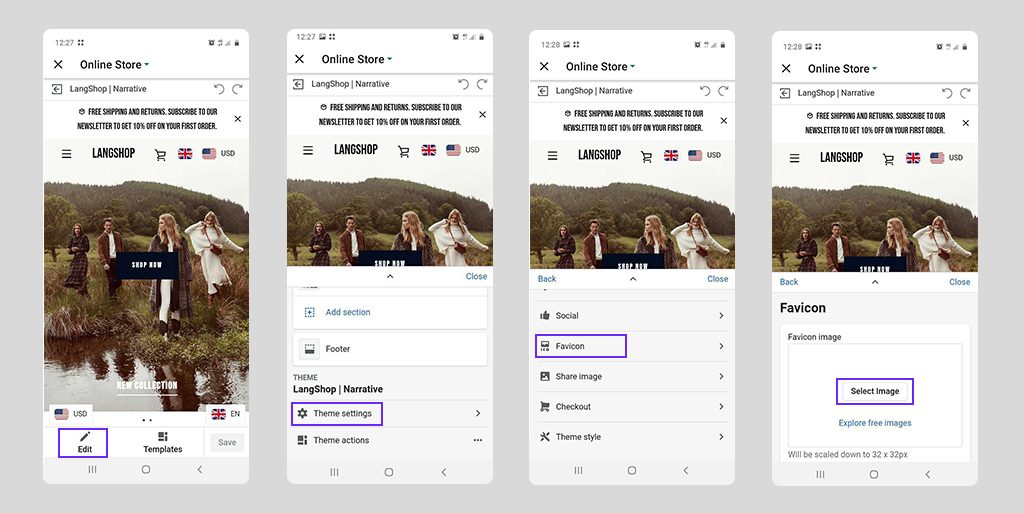
3. On this page, you should select Edit. Scroll the page down and find the text Theme settings and Theme actions. Choose the action you need and continue with the following guide:
– Selecting the Theme settings option, click on Favicon, and upload the image.
– Selecting the Theme action, go to the section Edit code => Assets => Add new assets. Then, go to the Layout => theme.liquid and change the data in the code snippet.
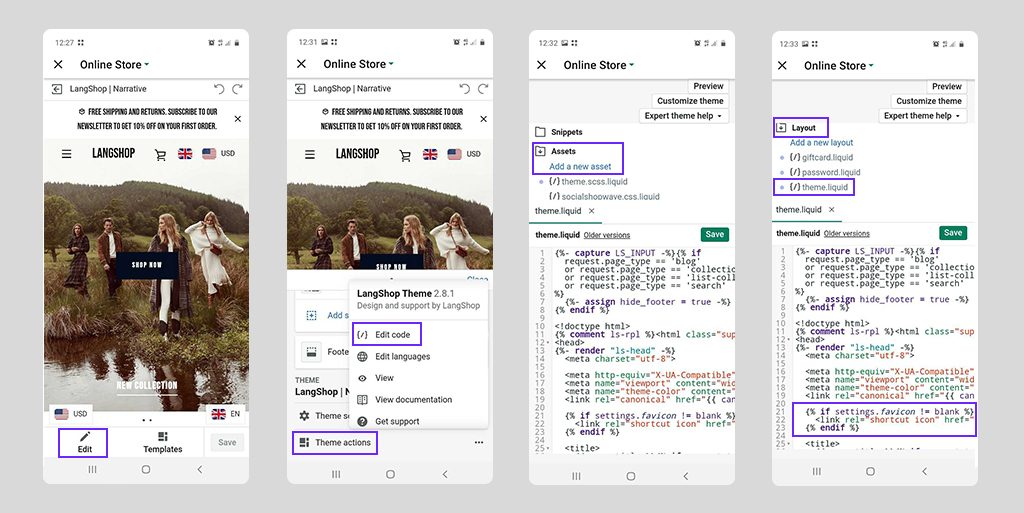
Original snippet:
New snippet:
NOTE: my-favicon.ico / my-favicon.png – the name of your favicon.
Don’t forget to Save your changes.
Final thoughts
In this article, we’ve tried to describe all available methods of changing favicon on Shopify store. So, to make changes, the following advice is recommended:
- Prepare the image of the appropriate size and format.
- Go to the store’s admin and add a favicon in a few simple steps.
- Use web admin or native mobile application.
We hope, this article and instructions were useful for you. I would like to remind you about other useful articles that can be helpful for Shopify merchants:

