Social networks are a very effective tool for business interaction with customers. Furthermore, they help to understand visitors’ behavior better and as a result create ads for relevant items.
Modern social networks continue developing. Consequently, nowadays they provide native promotion tools and analytics services. In the current article, we are going to consider the great opportunities for one of the most popular social networks. Namely, we’ll consider how to add your Facebook Pixel to the Shopify store.
Before we start
To add Facebook Pixel to any website, having an Ad and Business manager account on FB is a prerequisite. You must have administrator rights in the listed accounts. Otherwise, you won’t be able to add the tool to the online shop.
Let’s get started!
- Briefly about Facebook Pixel on Shopify store
– What is Pixel?
– How does it work?
– Who does it need? - How to add Facebook Pixel to Shopify
– Create a Pixel in your account
– How to install Facebook Pixel to Shopify
– Privacy - Extensions – Facebook Pixel helper
– Why do you need a Facebook Pixel helper?
– How does the Facebook Pixel helper work? - Improve conversion by using the dynamic product ads
- Final thoughts
Briefly about Facebook Pixel on Shopify store
What is Pixel?
It the Facebook native analytics service.
In fact, it is a few lines of code or 16-digits ID that you implement to the website. This code snippet allows the FB platform to get info about the customers’ behavior on the created advertisements and analyze it.
By installing snippet to the website the following info will be displayed:
- Popular pages among customers
- Not popular or not visited pages
- The scroll depth of pages
- Time and duration of a visit
- Add to cart actions
The events list is not full. The service provides an opportunity to track multiple events. Check the list on the official page.
If to speak about other Facebook Pixel ID opportunities, you are able to track conversion actions from different devices, optimize ads, form audiences, and effective advertising campaigns.
The service also shows you customers’ actions after viewing your advertisements. If their actions do not meet business expectations, adjust the website page or the advertisement in order to improve the user experience.
How does it work?
Just imagine customers that surfing the Internet and different stores in order to find necessary things. They see an attractive advertisement of your store, decide to visit the website, and do some actions (watch pages with products, read their description, etc). At the same time, the installed tool captures customers’ actions. Then it sends results to the Business Manager account.
So, what’s next? Firstly, you should create a Pixel. Secondly, add Facebook Pixel code to the Shopify website (the detailed guide is provided below). The next step – check the correctness of the work. After code activation, wait for some time because the tool requires time to collect and prepare data.
Now, it’s your time to analyze the received data and decide what action to take next. For example, you’ve developed a page where a person should fill the form or click the button to move to another page. But visitors don’t do this. Or you notice that some products are interesting for people but the purchase did not take place. And that’s a reason to examine visitors’ behavior carefully and change something.
For example, you can create a personalized advertisement for people who visited your store and watched particular goods. We consider an example of dynamic ads below in the article.
Who does it need?
E-business owners and marketing specialists who invest in advertising on FB. Spending a certain amount of money on advertising, each advertiser wants to return money for it and increase income. So, due to the code snippet, you’ll get more effective advertising and increase your ad ROI.
Businesses of any size have the opportunity to use this tool. If you’ve just run a store, you are unlikely to get a lot of traffic right away. But the use of different advertising and analytics tools allows you to achieve results much faster. And now let us see how to add and add Facebook Pixel to Shopify.
How to add Facebook Pixel to Shopify
Create Pixel in your account
There are several ways how to install Facebook Pixel to Shopify. However, before we start talking about how to add Facebook Pixel to Shopify, let’s try to create it in your account.
- Firstly, you should go to the Events Manager.
- Press on the green plus in the upper right corner and press Connect Data Sources > select Web.
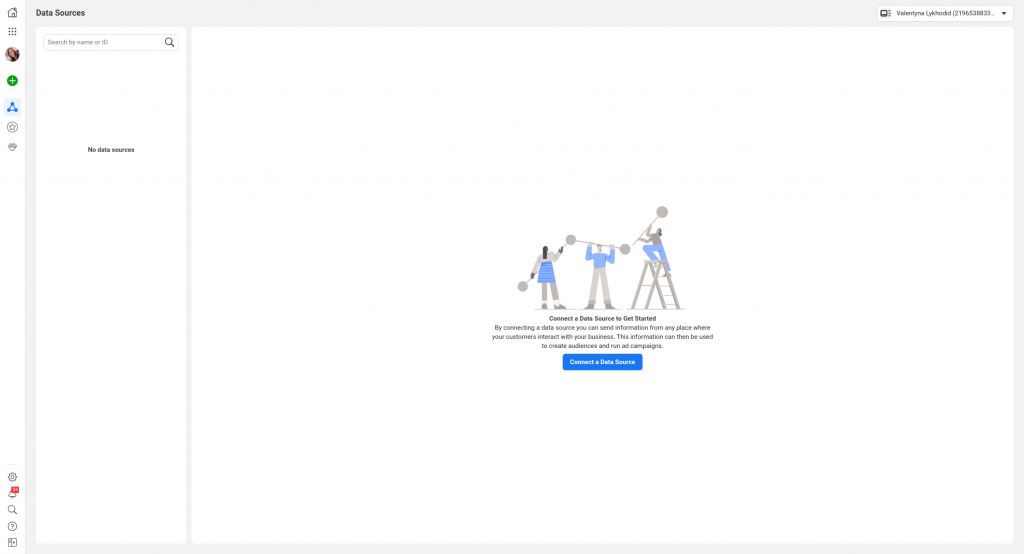
- Now select Facebook Pixel > Connect.
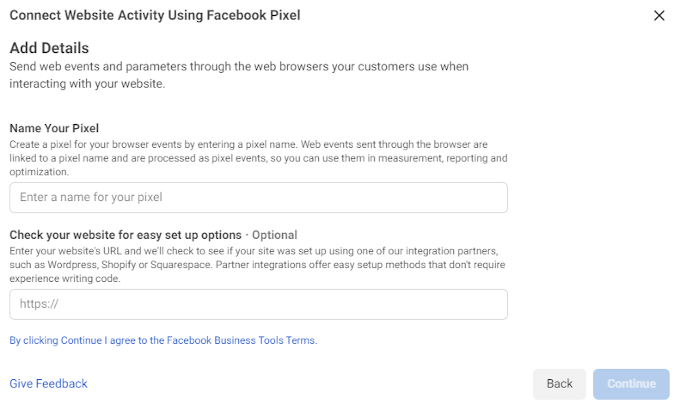
- Enter the name of your code snippet. There is also an optional feature – enter your site URL and check if it uses the Facebook integration partners. But you shouldn’t do this because you use CMS that is an official integration partner of the FB platform. So, just click Continue.
Well, actually your Facebook Pixel ID has been already created and you can find it on the upper left corner of the screen. It’s a line of 16 digits. On the screen below we show an example of ID. You will have your unique ID.
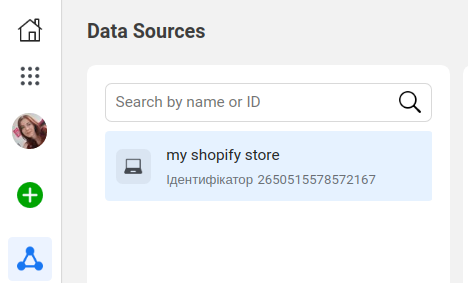
Copy it, go to the CMS store admin > Online Store > Preferences > paste the ID in the Facebook Pixel field. If the field is not activated, then you need to click Set up Facebook and add the channel to your online resource.

Actually, that was the first and maybe the simplest way. But there are also 3 other methods of how to add a Facebook pixel to Shopify. You can find them in your Events manager:
- Insert manually – select this option if you want to install a snippet to the website by yourself (or with the help of your developer). You need to copy the snippet provided in the field and paste it into the website code.
- Use a partner integration – the social network has several partners. The Shopify CMS is one of them.
- Email instructions – tap on this option and the detailed guide will be sent to your email.
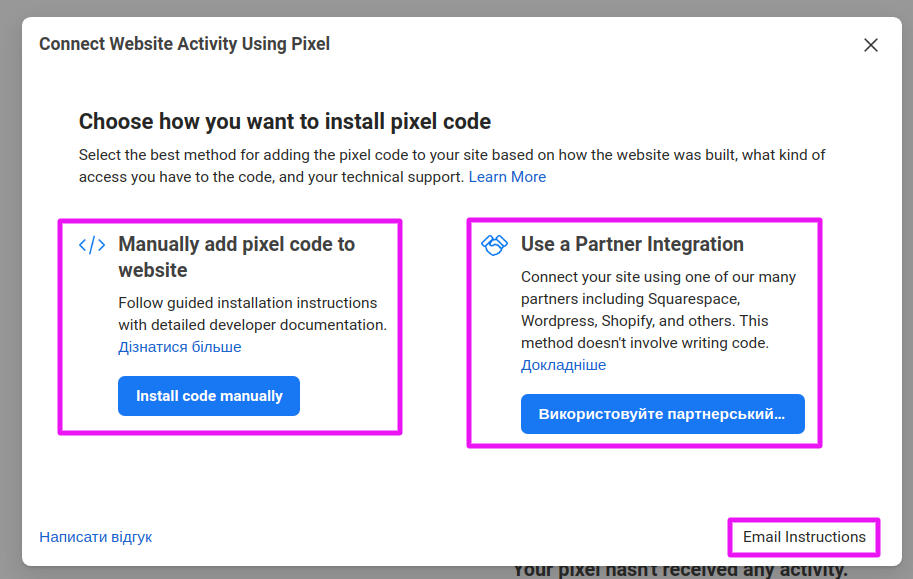
Select the most suitable method for you.
By the way, we recommend you to check the official documentation about how to create and install the snippet.
How to install Facebook Pixel to Shopify
In this section let’s consider the partner integration. The considered platform partnered with Facebook and you can easily connect them.
So, when you entered the name of your pixel and clicked Continue, you should select Use a Partner Integration. You will see a large list of partners.
- Find your CMS and select it.

- Now you need to connect your Shopify account.

- Verify the connection and confirm it.
To create a Facebook channel on your store you should follow a few steps in the admin:
- Go to the Settings section > Sales channels.
- There you should install the Facebook channel. So, press Update sales channel.
- Now you need to press on the Start set up > Connect account.
- Go to Facebook and sign in to your account.
- Now you should connect assets and accept terms and conditions.
- Finish setup.
Now you have a FB channel on your online shop and you are able to connect your accounts without problems.
Useful links:
By the way, note, that one snippet is enough for web-store if you manage several pages. Of course, you can make 100 pixels in your account and use them anytime you need. Anyway, it’s not necessary. One snippet / ID works well on multiple stores.
What is next? Once you’ve added a snippet, you can move on to setting up custom conversions. It’s better to do this in your Events Manager. There you find a list of events that you can track.
There are standard and custom events and custom conversion. In the official Conversion Tracking Guide, you are able to get more info about all available events and ways to set up them.
Privacy
Don’t forget, that Pixel it’s a part of FB and the platform requires notifying visitors about the collection of data. It means that you need to set up cookies for your snippet. How to do this? The official documentation has answers to this question. Learn more here: About Cookies and Pixel.
Extensions – Facebook Pixel Helper
Why do you need Facebook Pixel Helper
Now, you have the code installed on your online shop and you get and analyze customers’ actions on your website. However, time flies and you can make changes to the website. The code interacts seamlessly with the online shop and any changes are reflected in its work.
So, how to understand if the snippet works well? In this situation, use Facebook Pixel Helper – Chrome extension that makes things easier.
Facebook Pixel Helper it’s a tool that allows you to determine if an installed code is working correctly. The reasons to the malfunction may be different. For example, the low website loading speed, incorrect installation, etc. So, let’s consider how you can check results.
How does the Facebook Pixel Helper work?
Firstly, you need to find the Pixel Helper in your Chrome browser extensions and install it. You can do this by following this link. Press on Add to Chrome. The icon appears in the upper right corner.
Go to your website and click on the icon. The extension shows if the code is installed correctly or there are errors.
During the website work, Facebook Pixel Helper will send you notifications with instructions on how to solve it when something went wrong but you should also check it manually from time to time.
So, the first way you can check results in Chrome. The Pixel Helper icon appears in Chrome when the installation is over. You should press on it and you will see a window with the result of the snippet interaction with the online resource.
The second way is Business Manager. Just enter your Business account and open the Pixel section. There you will see how the Facebook Pixel code works.
And the last step, if you use Google Analytics check the received data with the data from Google Analytics. Your reports should be approximately the same. If data is different then something went wrong and you should pay attention to the Facebook Pixel helper.
Improve conversion by using the dynamic product ads
We’ve already considered the principles of Facebook Pixel ID work and ways to check its correctness. Let’s talk about opportunities that the considered social network platform opens in the conversion improvement area.
Thanks to the Facebook Pixel code you’ve seen that there are a few items popular among the particular audience. For example, you noticed that some visitors watched the same product but didn’t purchase it.
Now you can target dynamic product ads filled with the information and pictures of the visited item. The text can be different depending on the location or events of the target audience. Thus, for one country the content may contain info about goods with a special offer. At the same time, in another country, people celebrate a holiday (Independence Day, for example) and you can make an ad with congratulations and a 20%-off sale.
Dynamic product ads advantages
- Personalization – your customers see only relevant content.
- Permanent display – you shouldn’t set up every advertisement separately. An automated campaign promotes your products without your intervention.
- Retargeting – customers will see products that they watched but didn’t buy. Kinda constant reminder about the canceled purchase.
- Search for new buyers – targeting a wide audience allows covering potential customers who are interested in your product but didn’t visit the store.
The most amazing thing about dynamic advertisements is that you have the opportunity to create templates. This is useful for those online shops that sell thousands of different goods. It takes a long time to set up advertisements for each item or its type. But this is not necessary if you customize the templates.
Dynamic ad templates will show relevant goods to customers depending on their behavior. Thus, you can be sure that people see goods they are interested in.
Note, that there are some design specifications for dynamic product ads. They are available on the official guidance. Please, learn them before you start creating dynamic product ads.
Final thoughts
Pixel is a free and reliable assistant that plays on your side. It’s available for all business owners or marketing specialists who want to promote goods effectively. If you are still thinking to install the code or not, then install it!
Using Pixel on Shopify helps you understand your customers, improve the store and marketing campaign, promote your relevant goods automatically, and predict the future behavior of visitors. The marketing strategy will become more accurate and aimed at the right audience.
In combination with the Facebook Pixel Helper and dynamic ads, you’ll get effective tools that help increasing sales and boosting your return on investment.
And besides, you can delete or disconnect the snippet anytime you need. But we sure you’ll like using this amazing tool.
We hope, this article was interesting for you. If you have experience working with Facebook Pixel, we’ll be glad to see your feedback and comments.

