
How often do you face the fact that your customers leave their products in the cart and just leave your store? Admit, if they viewed your products, added them to the shopping cart, but, in the end, didn’t buy them – something prevented them from taking this last step.
This is exactly the case when people hesitate to buy viewed products for any reason, and such people become “missed customers” because they missed the opportunity to buy. As a result, you lost the connection with them. Now, your main goal is to re-establish this connection by running dedicated ads on social media platforms like Facebook.
In this article, we will guide you through the right steps and will show how to set up effective Facebook Dynamic Ads.
- Facebook Dynamic Ads: what are they?
- Why are Facebook Dynamic Ads important?
- How to set up Facebook Dynamic Ads: 4 simple steps
- Conclusion
Facebook Dynamic Ads: what are they?
Facebook Dynamic Ads are the advertisements reminding customers about the products they were interested in and showing similar products that they might like.
These ads are aimed at retargeting your products. They will display the announcements across Facebook to relevant customers to attract them to buy more and to increase your sales.
Dynamic ads are an efficient way to promote products because they are personalized. You can set up a target audience which means showing your ads to buyers that will definitely be interested and will click on them to go to your store.
Why are Facebook Dynamic Ads important?
So, why should you use Facebook Dynamic Ads?
As we mentioned above, the main aim is the attracting new customers. You can not only promote the products but also expand the audience and interest many users who might be looking for them.
The main advantage of Facebook Dynamic Ads is that you don’t need to create a bunch of different ads for each product. It is enough to use one template that will automatically add all the necessary information about every product (its title, description, price, brand, picture, etc.). This way, you create only one announcement but all your products are loaded automatically, so, you advertise the whole catalog.
Let’s see how Facebook selects the audience to show your ads.
Over many years, Facebook has already collected a considerable database of different users. So, it knows exactly which users are more likely to respond to these products. For this, it tracks users’ behavior, then, compares analyzing your product catalog, and matches it to the selected users. That’s it!
Using dynamic ads is a great way to improve your CTR and boost your sales. Here are the goals why to use Facebook Dynamic Ads:
- aware customers about the viewed products or pages;
- make them want to return to your store and complete the purchase;
- upsell some additional products that may be related to the viewed ones.
As you can see, these ads can take your sales to a higher level. So, let’s figure out how to set them up and start bringing more customers to your Shopify store.
How to set up Facebook Dynamic Ads: 4 simple steps
#1 Facebook Pixel – your analytics helper!
Before you start setting up your dynamic ads on Facebook you need to know your customers’ behavior and their actions in your online store. For this, there is a great and indispensable tool for your further ad campaigns – Facebook Pixel.
So, what is this tool? It is a piece of JavaScript code that you add to every page on your store. The Facebook Pixel is destined to monitor all the analytics related to your ad campaign.
How does it work? It controls customer behavior in your store, measures the effectiveness of your ads, tracks and optimizes the conversions, segments the audience, and more.
To all the tasks mentioned above, one more needs to be added – it’s retargeting. It helps to promote your products to show them to more customers across Facebook.
What should you do to set it up?
It is very simple. You just need to copy Pixel’s code and add it to your website. It will start collecting data to give you a detailed user analysis. And then, it will know exactly which users to advertise your products to.
Here what this code looks like:
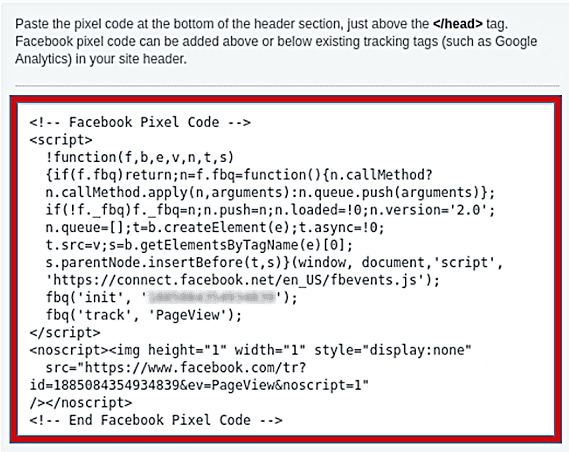
So, the first thing you need to do is generate this code in your Facebook Ads Manager. Then, you should add it to your source. Among the three options for setting the pixel, the manual one is the most optimal.
After you have chosen this installation put the generated code into your site’s template and activate the events to monitor the users’ actions. Remember that each event has its own generated code. The most valuable events to choose from are: “View Content”, “Add to Cart”, “Add to Wishlist”, and “Purchase”.
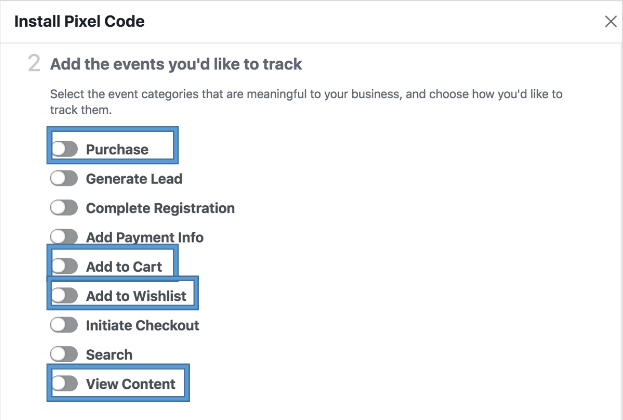
The first event (“View content”) will monitor the visits to your website. It will aware you which users were interested in your products, therefore, Facebook Pixel will track them and offer to buy the viewed products.
The “Add to cart” and “Add to wishlist” events help identify customers who are intended to buy your products and are interested in them. With this event, you can offer them more similar products and entice them to return to your store. As a result, you build customer trust and increase their loyalty.
The last event allows you to know your loyal customers and offer them a wider range of the products they might need.
Depending on the event you will get different codes that need to be placed in the “event block” in your pixel code. You can look at the example below:

Thanks to these events your ad campaign will be shown to the most interested shoppers, and, as a result, you will bring more traffic to your store.
More detailed instruction about the installation of Facebook Pixel you can find in our another article “How To Add Your Facebook Pixel To Shopify?”: https://langshop.app/blog/how-to-add-your-facebook-pixel-to-shopify/.
#2 Select the right products for product feed
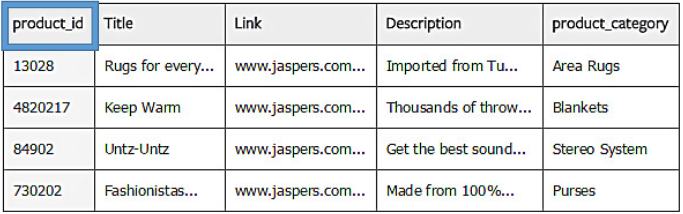
To launch successful dynamic ads you need to select the most relevant and right products from your Shopify store. That’s why you need to create a product feed. It should be a well-structured file in a recommended CSV format (also TSV / XML are possible) with a list of your selected products. Don’t either forget about the Unicode (UTF-8 or UTF-16).
This list should contain the following parameters:
- product name;
- its unique number;
- category, price, currency;
- availability;
- images;
- description, etc.
It should be noted that all of them should be organized in a table and each parameter should be placed in a separate line and the correct order.
As soon as this file is created you need to upload it to your Facebook Ads Manager. But first, verify for the mistakes with the Facebook Debugging tool. If there are some they will be highlighted with a particular color (red or yellow).
Once you’ve ensured that everything is OK with the product feed you can go to the next step.
#3 Create a Product Catalog
After you’ve created your product feed it’s time to organize it in a catalog. Go to your Business Manager to select the “Catalogs” section and with one click on the “Create Catalog” button you will create a new one.
The next step is the settings. You need to choose the catalog’s name and its owner. After it, add the necessary products.
There are three possible options: to connect your earlier created product feed to the catalog, to add products manually (if you have a small number of them), and to use Facebook Pixel (a perfect option for a store with numerous items).
Then, you can create different product sets that will unite the products by particular characteristics (e.g. different sales, recent products, their availability in stock, etc.). You should choose what label your set will contain.

For example, such product sets can be filtered by the price, brand, or other categories. You just need to indicate the necessary label for which you want to filter the products to advertise them. It is recommended to create several sets at a time to reach a larger audience as possible.
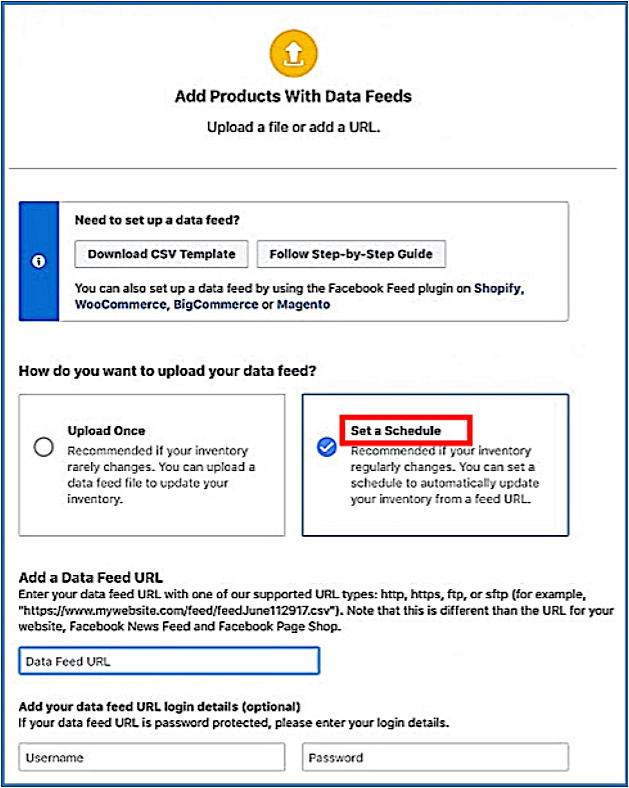
One more piece of advice for your catalog – keep it actual and relevant. For this, choose “Set a Schedule” for your data feed uploads that will update your products’ information. This way, when it changes in your store, it will change in the Facebook Ads as well. Also, you need to link Facebook Pixel to your catalog.
Once all these steps are done you have your product feed “wrapped” in the catalog container. Now, you can use this catalog in your further ad campaign.
#4 Launch your Facebook Dynamic Ads
We have come to the final part of the Facebook Dynamic Ads setting up. Now, all the main work is done and you need to upload all the previously created files into your Facebook Ads Manager.
But firstly, here you will create a new ad campaign. Click the “Create” button and in the opened box you’ll need to set the campaign’s name, the buying type, and in the “campaign objective” field you’ll need to select the “Catalog Sales” option. At this stage, you need to upload your catalog with the selected products.

The next step is to set up the ads: select the products you want/don’t want to promote. By doing this, Facebook ads will know exactly what products will need to be shown to customers. Target your audience (choose the ), placement, budget, and schedule the ads too.
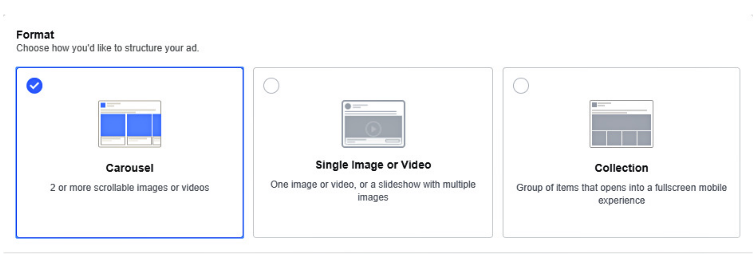
The final step is to create the group of ad announcements and choose one of three kinds of files: the dynamic ads with a carousel gallery, the ads with the collection, or the ads with a single image.
Now, all you need to do is to launch your ad campaign and Facebook will create a template to show how users will see it.
So, after that, you just click the “Publish” button and your dynamic ads are launched. They have already begun promoting your products to the customers and bringing more traffic to your store.
Conclusion
When it comes to advertising the products and attracting new customers, or retaining already existing ones, many store owners often face the need to set up a lot of ads for hundreds or even thousands of products.
This whole process makes them wasting their time and resources to aware their customers of the relevant products. And this is quite tiring!
Therefore, Facebook Dynamic Ads are the perfect solution to stay in constant touch with your potential customers and effectively promote every product effortlessly.
We hope that in our article you have found the answers to the main questions concerning the dynamic ads on Facebook. By following these 4 simple steps that we described above you will know exactly how to set up effective ads that will save your time and will give a significant result.


